- You should have a table ready with the data you want to import. The titles of your new FAQ's in one column, the HTML-formatted content in the next and the keywords in a third column.
- You should have access to phpMyAdmin via your web host.
- You should have already created a few entries manually in your phpMyFAQ.
- This guide is intentionally extensive, but the individual steps can be completed quite quickly once you understand them. It is important that you don't make any mistakes when uploading to your DB, so take your time the first time you try it.
Export the necessary tables
Open phpMyAdmin. First check whether the correct database is displayed. You can switch to a different database at the top left. At the top left you can see the name of your database and below that the names of the individual tables. From this list, select the following 5 tables (one after the other) and click on them once to select them:
- faqdata
- faqdata_tags
- faqcategoryrelations
- faqdata_user
- faqdata_groups

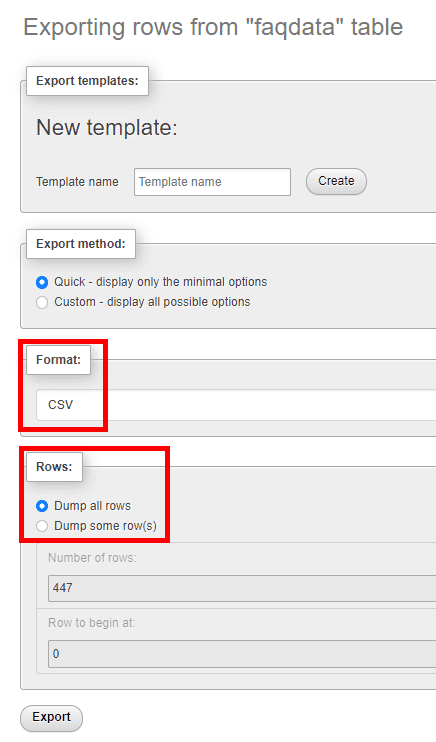
As soon as you have selected one of the 5 tables, the contents will be displayed on the right. Now click on the Export menu item at the top.

Select CSV as the format. Make sure that Dump all rows is selected. Then click Export at the bottom.
Save all 5 CSV-Files in a separate folder on your computer. Then you can close phpMyAdmin for the moment.
Edit the tables
Open the first CSV file faqdata.csv with the spreadsheet program of your choice. (You can use LibreOffice, OpenOffice or Excel, for example.) Look at the table BEFORE you make any changes. Pay attention to the column headings and the contents of the individual fields. DO NOT change the column headings. Because the database does not like errors, you should handle it carefully.
The id column contains an ascending number that is assigned once and identifies each post. So for a new post you only need to count one further. This also applies to the solution_id, which can be used later to access individual FAQs. The keywords for the respective post should be entered in the keywords column, separated by commas. In the topic column you enter the question or the title of your post. The HTML-formatted content of the post should be entered in the content column. For the remaining columns, just use the existing entries as a guide. Check everything you have entered again. It's better to look at it once too often at the beginning until it becomes easier for you later. Save the table in exactly the same format as a CSV file, then you can close it.
In order for the data from this first table to be displayed, the exact right values in the other four tables are also required. Only then will it work and your data will also be displayed.
You've probably already assigned some important tags to your existing posts, otherwise please do that now from within phpMyFAQ before we continue. It's best to just use one tag per post.
So now let's take the second table faqdata_tags. On the left is the record_id, which matches the unique id from the previous table, but just is named differently. So for a new post you have to increment one here too. REMEMBER that this number refers to the exact post whose data you have already entered in the faqdata table! In the right-hand column there is a number that identifies the assigned tag.
Within the Tags section of phpMyFAQ you can hover your mose over the red trash can and your browser will now show you a link at the bottom left that ends with our tag number. You should note down the tags and their numbers in a text file to have them at Hand later. With this knowledge we can now enter the desired tags in the table for our new posts. Check again and you can close the table.
We continue with the third table, called faqcategoryrelations, and this is now about the categories. The number in the first column category_id identifies the category in which the new post should be sorted. You can assign the number to the category in exactly the same way as you did with the tags. So make a quick note in your text file! You can now enter the numbers so that the posts end up in the right category. On the right at record_id we have the unique ID that identifies the post. Once you have entered everything, save and close.
The fourth file called faqdata_user.csv is easy. Just put in the *unique id* of your new entries at the left and *-1* at the right. Save and close.
The fifth file is almost the same as the fourth. Just put in the *unique id* of your new entries and *-1* for each new entrie you have made.
Upload the finished tables
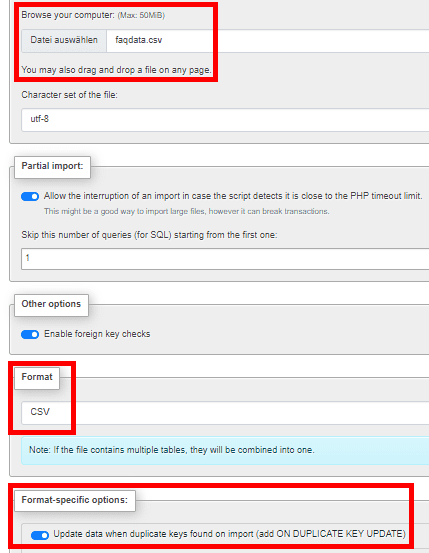
Now we have all the data ready to import. So we open phpMyAdmin again. Select the correct table on the left. Click on Import at the top. Select the correct one of your 5 CSV tables out of your folder. For Skip this number of queries, select 1 so that our column headings are not created as a post. The format must be CSV. Check also update data when duplicate keys found on import. Otherwise changes to existing entries won't be saved. Else everything should be fine. Now click on Import.
We'll do that four more times with our other files.
Now go to your phpMyFAQ and check your new entries.